
The Qualtrics quota setup guide will tell you to set the quota option to “End current survey” when the quota fills up. That can work, but it drastically limits your control over what happens to respondents, and what happens to your data. On a real project, with a panel, several segments to fill, separate redirects for completes, screen-outs and over-quotas, it usually won’t cut it.
We program quotas in Qualtrics a different way: the quota just counts, and the Survey Flow determines what happens. This step-by-step guide walks through the exact setup we use on our own projects, with screenshots, plus how to watch your counts live with a public quota dashboard. (New to the platform? Start with our overview of Qualtrics.)
Why we set every Qualtrics quota to “None”
Every Qualtrics quota has conditions (who counts toward the segment), a target (how many do we want) and an action (what happens when it fills up). For the action, we always use None (for skip logic and survey flow).
This helps us keep all our logic in one place. In the Survey Flow, you can see exactly what’s happening: who qualifies for a segment and what happens when the segment fills up. We can decide which end of survey message or redirect URL they get, whether we keep their data in the dataset, and if we do, set embedded data specifically for these over-quota respondents. Nothing is buried in the quota settings.
Step 1: Set up a status variable and your panel links
At the very top of the Survey Flow, add a Set Embedded Data element with:
- PanelID: captured from the panel’s entry link – work with your panel company to determine what variable they’ll be using in their URL. Make sure to set it as embedded data. PanelID is just a placeholder in this example.
- gc = 99: our status variable. “gc” stands for good complete. Everyone starts at 99, and the value only changes when we know how they left the survey.
- completeLink, screenOutLink and OverQuotaLink: Your panel provider will give you their unique links for Complete, Screen Out, Over Quota, and Qual Term. Make sure you append the Qualtrics pipe for the incoming panel ID variable you captured. In this example, we used ${e://Field/PanelID}.
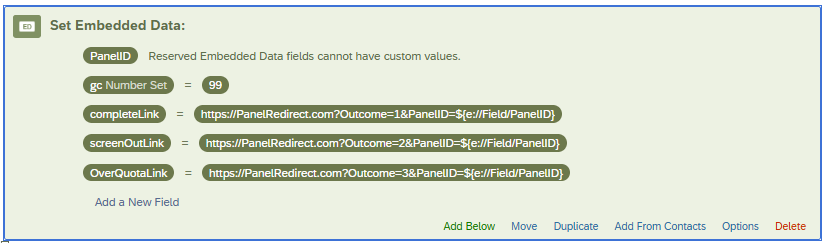
Setting the links here means we only have to set these once. The end of survey dialogue just pipes in the correct URL.
Step 2: Create the quota in Qualtrics
Go to the Survey tab and select Quotas (the gauge icon in the left-hand menu). Add a quota and give it a short, clear name. We use names like F_30_34 (female, 30 to 34), because the same name appears in the Survey Flow and on the dashboard.
Under Logic conditions, Qualtrics asks for the conditions to “increment the quota when a response is submitted”. There are two ways to set them up.
Option 1: Base the quota on the questions
Point the conditions straight at the screener questions. It’s quick, and it’s fine when a cell maps neatly onto one or two answers.
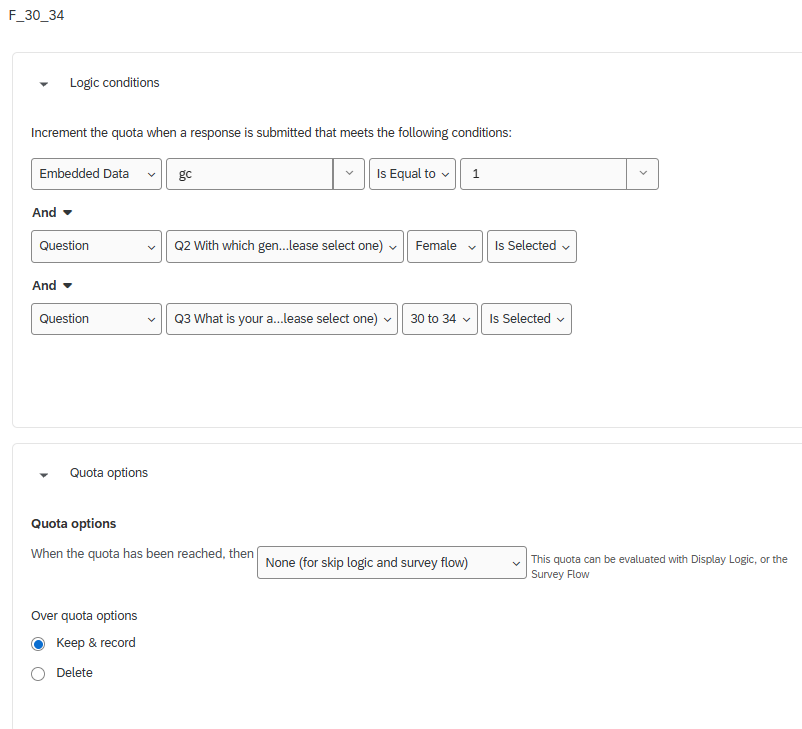
Option 2: Create the embedded data in the flow
Right after the screener, add branches that set a flag for each cell. Here, a gender branch holds an age branch, and only respondents who match both get F_30_34 = 1:
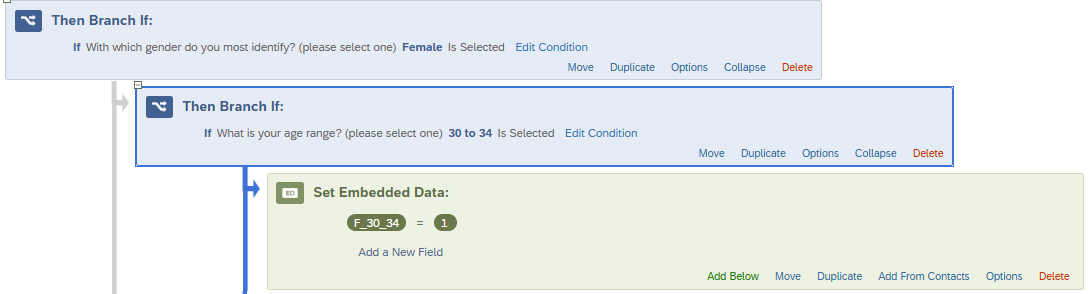
The quota then checks that flag instead of the questions. This is our preference on bigger studies: complex cells are defined once, the flag is reused in the over-quota branch, and it lands in the data file as its own column.
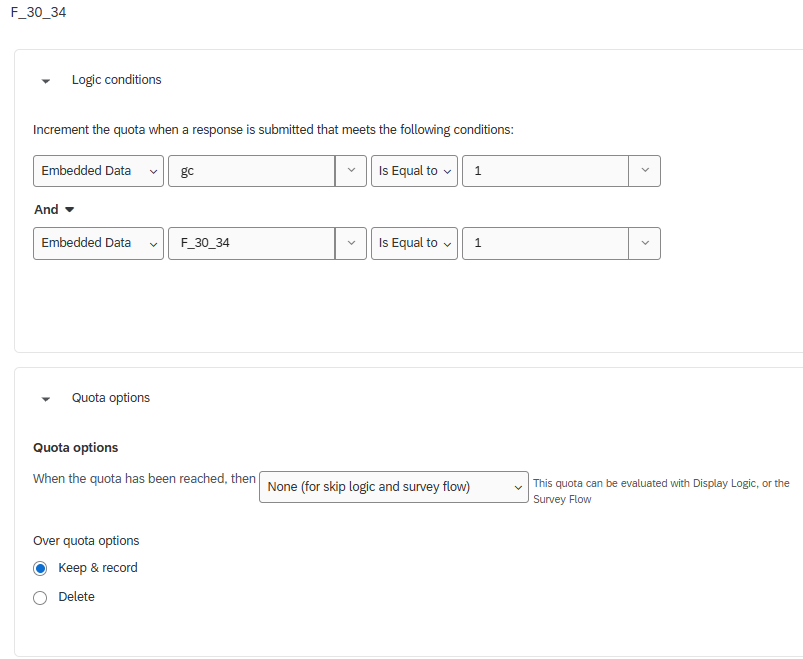
Whichever option you use, two settings never change:
- gc Is Equal to 1 is always one of the conditions. That’s what makes sure only good completes are counted (more on this in Step 4).
- Under Quota options, “When the quota has been reached, then” is set to None (for skip logic and survey flow).
Step 3: Send over-quotas out through the Survey Flow
Straight after the screener (and the flags, if you used Option 2), add a branch for each quota:
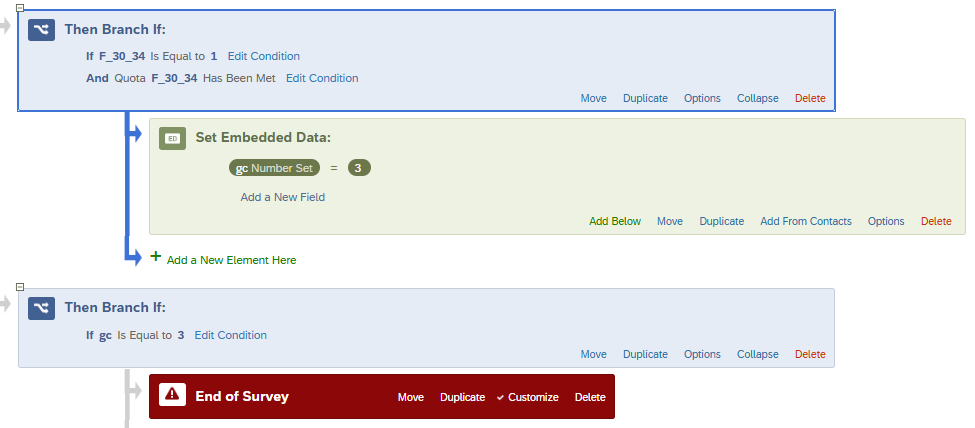
Two things to notice. First, the branch checks both that the person belongs in the cell (F_30_34 = 1) and that the quota has been met. Second, the branch only sets gc = 3. A separate branch further down (If gc Is Equal to 3) holds the End of Survey. With ten quotas, you have ten small branches that set gc = 3 and one exit to maintain.
On that End of Survey element, click Customize, tick Override Survey Options, choose Redirect to a URL and pipe in the over-quota link from Step 1, e.g. ${e://Field/OverQuotaLink}.
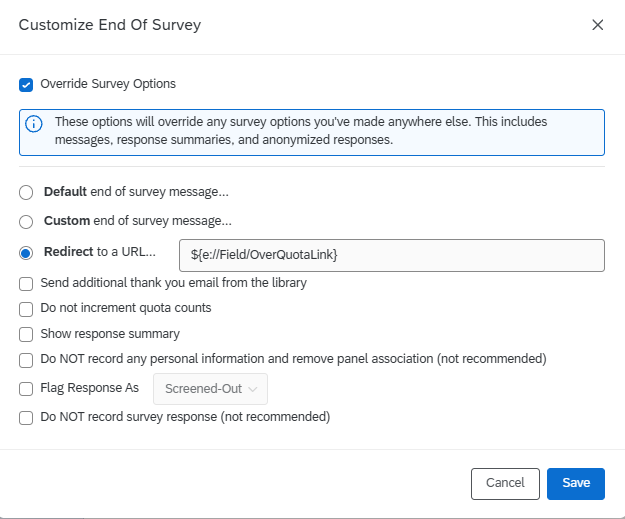
Screen-outs work the same way: set their own gc code and send them to screenOutLink.
Step 4: Set gc = 1 as the very last thing in the survey
At the bottom of the Survey Flow, after the last question block, we add a final group: Set Embedded Data gc = 1, then the End of Survey that redirects to completeLink.
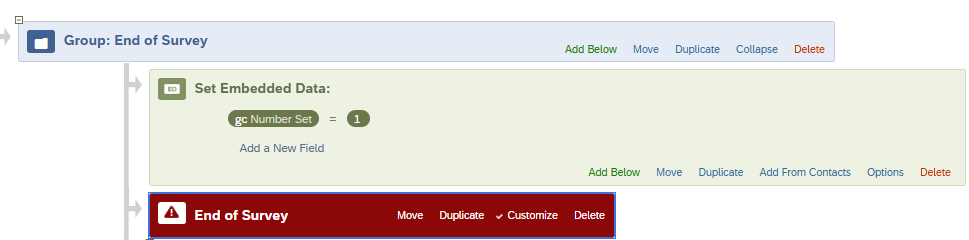
This is what makes the whole system work. Only someone who answers every question, isn’t screened out and isn’t over quota ever reaches this point. Because every quota requires gc = 1, only genuine good completes move the counters. Screen-outs, over-quotas and drop-outs never do. And every respondent ends up with a status code you can reconcile against the panel’s numbers at the end of fielding.
Step 5: Track your quotas with a Qualtrics public quota dashboard
Once you’re in field, you want the counts without opening the survey every time:
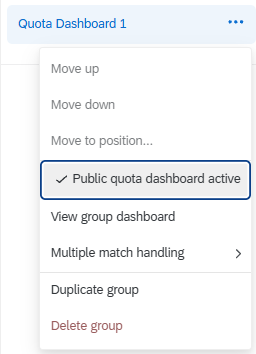
- On the Quotas page, under Quota Groups, click the three dots next to your group.
- Click Public quota dashboard inactive. It switches to Public quota dashboard active with a checkmark.
- Click View group dashboard, then Copy Link to share it. Anyone with the link can see it, no Qualtrics login needed.
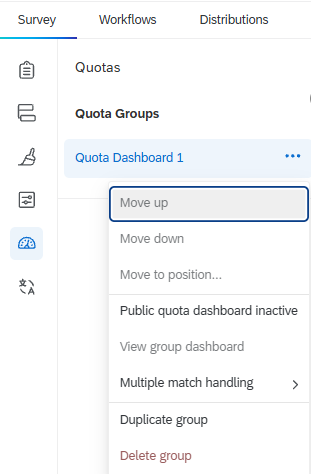
We send the link to the client at launch, so the “how are counts looking?” emails stop. If one cell stalls, you’ll see it early and can raise it with the panel while there’s still time.
Qualtrics quota mistakes we see when we take over other people’s surveys
- Branching on “Has Been Met” alone. Without the cell condition (F_30_34 = 1), that branch ends the survey for everyone who reaches it once the cell is full.
- No completion check in the quota. Without a condition like gc = 1, terminates and overquotas still tick up the quota count.
- Checking quotas too late. Over-quota branches belong right after the screener, not ten minutes into the survey. Don’t waste respondents’ time.
- Launching with test counts. Test responses can count toward quotas. Reset each quota before launch.
Qualtrics quotas: quick answers
Do partial responses count toward a Qualtrics quota?
No. Qualtrics only increments a quota when a matching response is submitted, so people who drop out partway never count. With the gc = 1 condition, only good completes count at all.
What’s the difference between “End current survey” and “None”?
“End current survey” ends the survey for matching respondents as soon as the quota is full, using the quota’s own settings. “None” only counts. You decide what happens in the Survey Flow, which is where we prefer to keep all the logic.
Can one respondent count toward more than one quota?
Yes. By default, a response counts toward every quota whose conditions it meets. Keep that in mind when your segments overlap, for example an age quota and a region quota.
Need a hand with Qualtrics?
Quotas look simple until you have twelve interlocking cells. Jackman and Associates programs Qualtrics surveys for research teams every day, including quota design, testing and live monitoring. See our Qualtrics services or get in touch.